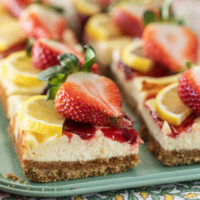
Strawberry Lemonade Cheesecake Bars
Zesty & Sweet: Strawberry Lemonade Cheesecake Bars
Hey there, it’s me again, diving into the world of zesty and sweet treats that you can whip up from the comfort of your home. Today, I’m all geared up to share a little sunshine packed in a dessert – Strawberry Lemonade Cheesecake Bars. Imagine this: juicy, fresh strawberries and tangy lemon, melded together atop a simple graham cracker crust, creating a symphony of flavors that’s just too good to resist. And let’s talk about that lemon flavour combination – it’s like capturing the essence of summer in every bite. Whether you’re a seasoned baker or just starting out, this recipe is a breeze. From the creamy richness of the cream cheese to the fresh, summer-y strawberries, every ingredient plays its part to perfection. And the best part? Watching the delight on the faces of your friends and family as they take that first bite. So, let’s get our food processor, fresh strawberries, and zest for life ready, and bake our way into the heart of summer!
Key Takeaways:
- Strawberry Lemon Cheesecake Bars bring the best of summer flavors to your tabletop.
- Simple, fresh ingredients and an easy-to-follow recipe make for a foolproof dessert.
- Perfect for any occasion, these cheesecake bars promise to be a hit with every crowd.
Gathering Your Ingredients
- Fresh strawberries: Essential for that summer-y touch, make sure they’re ripe and juicy.
- Lemon juice: Fresh is best for that zesty kick.
- Lemon zest: Adds an extra burst of lemon flavor, capturing the essence of summer.
- Cream cheese: The base of your filling, ensure it’s at room temperature for smooth mixing.
- Powdered sugar: For a smooth and sweet cheesecake filling.
- Vanilla extract: A dash adds depth to the filling’s flavor.
- Graham cracker crumbs: For a simple yet delicious crust.
- Melted butter: Binds the cookie crumbs for the perfect crust.
Preparing the Simple Graham Cracker Crust
Hey there! Let me walk you through one of my favorite parts of making these absolutely delightful Strawberry Lemonade Cheesecake Bars – creating that simple graham cracker crust. It’s honestly so easy yet makes such a difference in the final dessert. First, you’ll want to grab your food processor. Into this little magic machine, you’ll toss in the graham cracker crumbs, powdered sugar, and that melted butter. Now, watch as it all combines into what I like to call ‘the foundation of joy’. The scent alone reminds me of childhood summers spent in the kitchen with my grandma.
Once you’ve got that crumbly, buttery mixture all ready, you’re going to press it firmly into the bottom of the pan. And I mean firmly. This step is crucial because it sets the stage for every luscious layer that follows. It’s the beginning of what’s bound to be the star at your next summer gathering. Remember, a little pressure here ensures that every bite has that perfect crunch contrast to the creamy, tangy layers above.
Making the Cream Cheese Filling
I have this small tradition in my kitchen, especially when the summer air starts to fill with the scent of fresh strawberries. Today, I’m diving into one of my all-time favorites: Strawberry Lemonade Cheesecake Bars. Making the cream cheese filling is like capturing sunshine and laughter in a bowl. First, I gather the cream cheese, which has been sitting at room temperature to ensure it’s perfectly soft. In a large bowl, I add the cream cheese, pouring in powdered sugar to sweeten the deal. A splash of vanilla extract for that comforting aroma, then the zingy lemon juice and its zest join the party, bringing in the lemon flavour combination that’s pure magic.
With my hand mixer, I blend everything until smooth, watching the colors swirl together. It’s like painting with flavors. Once it’s all creamy and dreamy, I gently spread it over the simple graham cracker crust, laying the foundation for what’s about to come – those fresh summer-y strawberries waiting to be layered on top. It’s a process, but every step is a promise of that first, blissful bite.
Adding the Strawberry Lemon Layer

Now, let’s dive into the heart of summer with the addition of the strawberry lemon layer, transforming our dessert into those lusciously zesty and sweet Strawberry Lemonade Cheesecake Bars. Begin by taking a medium bowl – yes, the very same one you might have used to whip up a quick salad on a lazy Sunday. But today, it’s about to cradle the vibrant hues of fresh strawberries. Into this bowl, gently toss the ruby-red slices of fresh strawberries, ensuring they’re basking in a glaze of lemon juice and zest. This isn’t just about mixing; it’s about marrying flavors as enchanting as a summer sunset.
The magic really unfolds when you layer this strawberry lemon mixture over the dense, creamy cheese filling that’s just sitting atop the simple graham cracker crust. It’s like you’re painting a masterpiece, only the colors are the enticing red of strawberries against the creamy backdrop, promising a burst of summer with every bite. Using the back of a spoon or a spatula, smooth this layer out with the care of an artist ensuring every corner, every space has its share of the strawberry lemonade charm. And there you have it – a layer so perfect, it whispers promises of delight with every glance.
The Baking Process
Now comes the exciting part – baking these zesty and sweet Strawberry Lemonade Cheesecake Bars. After meticulously layering your simple graham cracker crust, creamy cream cheese filling, and the vivacious strawberry lemon mix, it’s time to introduce them to the warmth of your oven. Preheat your oven to 350°F – this magic number is where our dessert starts to transform. Place your baking dish in the center of the oven to ensure an even bake, crucial for achieving that delightful golden brown finish.
Patience is key here. Let them bake for about 45-50 minutes. You’ll know they’re just right when the edges start to lightly brown, and the center is set but still slightly jiggly – this means your creation is baked to perfection. Another hint? The fragrance. Your kitchen will fill with a scent that’s both comforting and invigorating – fresh strawberries and zingy lemon swirling together in a dance of flavors. Once baked, allow these bars to cool to room temperature before slicing into them. This not only makes for cleaner cuts but also ensures that every bite is a perfect mix of textures and flavors, chilled just right.
Cooling and Cutting the Bars
After the sweet aroma fills your kitchen and you patiently wait for that golden hue on your Strawberry Lemonade Cheesecake Bars, comes a crucial step – cooling. I know, it’s tempting to dive right in, but trust me, waiting is worth it. Allowing the bars to cool completely not just tests your patience but ensures that when you slice through, each piece comes out clean and perfect. Imagine pulling that first bar out, seeing the layers of simple graham cracker crust, cream cheese filling infused with lemon zest and juice, topped with fresh strawberries, all sitting pretty because you allowed them the time to set. So, pop them in the fridge if you like, making them even firmer for that clean cut. The best texture, the tight layers that make each bite a harmonious blend of zesty lemon and summer-y strawberry – it all comes down to letting them cool. Store them properly in an airtight container, and you extend that joy even further, each bar as delightful as the first.
Serving Suggestions
After you’ve lovingly prepared your Strawberry Lemonade Cheesecake Bars, and they’ve cooled just right, it’s time to think about serving them up in a way that’ll make your mouth water all over again. I personally love adding a little extra oomph to my serving suggestions because, let’s be real, who doesn’t like a pretty plate?
- Dollop of Whipped Cream: A fluffy dollop of whipped cream on top of each bar isn’t just about aesthetics; it adds a creamy texture that complements the tangy lemon flavor and the sweetness of the strawberries.
- Fresh Strawberry Slices: Garnish each piece with fresh strawberry slices. It’s not only a nod to the strawberry lemon vibe we’ve got going but also introduces a refreshing juiciness with each bite.
- Mint Sprig: For a pop of color and a hint of freshness, tuck a small mint sprig next to each serving. It’s like dressing up your dessert for a special occasion!
These touches make each serving of your Strawberry Lemonade Cheesecake Bars just a little more special, turning a delicious dessert into an unforgettable treat. Whether you’re enjoying these at room temperature after a sunny day or pulling them from the fridge for a cool eves snack, they’re sure to bring smiles.
Storage Tips
After you’ve lavished love on making these Strawberry Lemonade Cheesecake Bars, you’ll want to ensure they stay as scrumptious as the moment they came out of the oven. The secret? Storage, darlings. First off, ensure your bars cool down completely. Patience here is your best pal. Then, pop them into an airtight container; this little move is a game-changer for keeping them fresh. If you’re planning on devouring these zesty beauties within a couple of days, keeping them at room temperature is perfectly fine. But, if you’re playing the long game, tuck them away in the fridge. They’ll keep beautifully for up to a week there. Just promise me one thing? Let them come back to room temperature before you dive in again. The flavors just sing so much more at that point.
Customization Ideas
Once you’ve mastered the art of making these scrumptious strawberry lemonade cheesecake bars, let your creativity take the lead and start experimenting with different flavors and textures. Picture this: you, in your kitchen, with the freedom to tweak this recipe to your heart’s content. Ready to get started? Here are a few ideas to inspire your next baking adventure.
- Explore with Berries: Why stop at strawberries? Imagine the burst of flavors you can get from raspberries, blueberries, or a mixed berry bonanza. Each brings its own unique flavor and a lovely pop of color to your dessert.
- Mix in Some Chocolate: For all you chocolate lovers out there, why not sprinkle some chocolate chips over the strawberry layer before baking? Or, drizzle melted chocolate over the top once cooled. Chocolate and strawberries are a match made in heaven, after all.
- Twist the Citrus: Lemon is classic, but there’s room to play. Try swapping lemon juice and zest with lime for a tangy twist, or even orange for a sweeter, subtler flavor profile. The possibilities are endless.
A Sweet Parting Note
Reflecting back on the journey of crafting these Strawberry Lemonade Cheesecake Bars fills me with such joy. From mixing the simple graham cracker crust with melted butter and powdered sugar in my food processor to watching the bottom of the baking dish turn golden brown in the oven, every step was a delightful adventure. The tangy lemon juice and zest infused with fresh strawberries created a flavor combination that was nothing short of a summer-y orchestra in the mouth. Spreading that rich cream cheese filling over the crust, then adding the strawberry lemon layer, brought me back to my early days in the kitchen – experimenting, tasting, and sometimes winging it with what I had.
I can’t help but smile thinking about you all, in your kitchens, hand mixer or spatula in hand, embarking on this baking journey with me. Whether it’s room temperature or chilled in the fridge, slicing these bars and placing them in an airtight container feels like preparing little gifts of love. I encourage you, with a heart full of happiness, to keep exploring, baking, and of course, sharing these little slices of heaven. Who knows what delicious dessert creation we’ll dive into next? But I promise, it’ll be just as exciting.
If you love this recipe check out my Lemon Cream Cheese Coffee Cake!
Strawberry Lemonade Cheesecake Bars
Ingredients
- Crust and Optional Crumble Topping:
- ½ cup butter melted
- ½ cup granulated sugar
- ¼ cup light brown sugar packed
- 1 ½ cups all-purpose flour
- pinch salt optional and to taste
- Filling:
- 1 large egg
- ½ cup sour cream
- ⅓ cup granulated sugar
- 2 tablespoons lemon juice
- 2 teaspoons vanilla extract
- ¼ cup all-purpose flour
- Strawberry Layer:
- 2 cups fresh sliced strawberries
- 1/2 cup granulated sugar
- 2 tablespoons lemon juice
- 2 teaspoons lemon zest
- 2 teaspoons cornstarch
Instructions
- Begin by preheating the oven to 350F. Line an 8-inch square pan with aluminum foil and coat it with cooking spray; this will facilitate easier cleanup and is highly recommended.
- For the crust and crumble topping, melt the butter in a large microwave-safe bowl for about 1 minute on high power. Add the sugars and whisk until combined. Mix in the flour and optional salt until a dry, sandy mixture forms with some larger crumble pieces. Reserve a heaping 3/4 cup of this mixture.
- Press the remaining mixture into the prepared pan to form an even, smooth crust using a spatula or your fingers. Set aside.
- For the filling, in a medium bowl, combine the egg, Greek yogurt, sugar, lemon juice, and vanilla. Whisk until smooth, then add the flour and mix until well combined. Pour the filling evenly over the crust, smoothing it out with a spatula. Set aside.
- Prepare the strawberry layer by mixing all the ingredients (except flour) in a separate medium bowl. If the mixture is very thin, add up to 2 tablespoons of flour to thicken it. Distribute the strawberry mixture evenly over the filling, smoothing it lightly with a spatula.
- Sprinkle the reserved 3/4 cup crust mixture evenly over the strawberry layer, squeezing it in your palm to create larger crumble pieces before sprinkling.
- Bake for 60 to 75 minutes, placing the pan on a cookie sheet to catch any overflow. The edges should bubble vigorously, and the crumble topping should appear set and pale golden.
- Allow the bars to cool in the pan on a wire rack for at least 2 hours (preferably overnight) before slicing. For cleaner cuts, chill in the fridge for 2 hours before slicing. Store the bars airtight at room temperature for up to 5 days, in the fridge for 7-10 days, or freeze for up to 4 months.
