Easy Prime Rib Roast
Mastering the Easy Prime Rib Roast for Any Special Occasion
I’ve always believed there’s something truly special about bringing family and friends together, especially over a meal. And what’s more iconic for those unforgettable gatherings than a succulent prime rib roast? It’s not just a meal; it’s an experience, a centerpiece that commands attention at any special occasion. Now, I hear you, the idea of cooking something as grand as a prime rib might seem daunting. But trust me, mastering an easy prime rib roast recipe is entirely within your reach, and I’m here to guide you every step of the way. The joy and satisfaction of presenting a beautifully cooked prime rib, with its tender, juicy interior and perfectly seasoned crust, are moments worth cherishing. It’s not just about feeding our loved ones; it’s about making memories that last a lifetime.
Key Takeaways:
- Prime rib roast is an extraordinary choice for special occasions, creating lasting memories.
- Mastering a simple recipe for prime rib is achievable for home cooks, ensuring confidence in the kitchen.
- The joy of serving a beautifully cooked prime rib roast brings unmatched satisfaction and pride.
Selecting Your Prime Rib Roast
Walking into the grocery store with a mission to find that perfect prime rib roast can be a bit daunting, but, oh, the joy it brings when you lay your eyes on the just-right one for your special occasion! Let me guide you on this: The size of your roast really depends on the crowd you’re feeding. Think about it—the best way to ensure there’s enough to go around (and maybe some leftover prime rib for the next day) is to account for about ½ pound per person if you’re going boneless, a bit more if you opt for a bone-in roast. Now, onto the grade.
If you can, aim for USDA Prime. It’s like the black pepper to your salt; it just makes everything better. This grade boasts superb fat marbling, which is a surefire ticket to flavor town. But, don’t just take my word for it, ask around. A good idea is to stick to those reputable grocery stores or your local butcher shop—they’re the gatekeepers of the prime grade, standing rib roast dream. They’ve got the inside scoop and the right places to find that gold standard roast, ensuring your holiday dinner turns into a remembered feast. So, whether it’s a cozy Christmas dinner or any special occasion, selecting your prime rib roast with these tips means you’re halfway through mastering the easy prime rib recipe. And remember, every perfect prime rib roast starts with the perfect rib.
Preparation Basics
So, diving into the heart of prepping our majestic prime rib roast, let me walk you through the essentials. Let’s chat about bringing that beautiful roast to room temperature. You see, pulling it out of the fridge and letting it sit cozily on our kitchen counter works wonders. This simple step is like a little spa day for our roast, ensuring it cooks evenly and gives us that perfect pinkness we’re all after.
Now, onto the fat side – it’s a bit like sculpting; trimming just enough but not too much. We’re looking for that golden balance where flavor meets tenderness. And the final touch, patting our roast dry with paper towels. It might seem trivial, but trust me, it’s the secret handshake to flavor town. This is how we make sure our seasoning sticks and adheres like best buddies, promising us a roast that’s not just cooked, but tells a story of flavor, tenderness, and love.
The Perfect Prime Rib Rub
Oh, let me tell you, finding the perfect prime rib rub felt like unearthing a kitchen secret that I just had to share with you! It’s all about grabbing those common kitchen ingredients that have been sitting in your pantry, waiting for their moment to shine. Imagine mixing a dose of kosher salt with a sprinkle of black pepper, a hint of garlic powder, and a whisper of dried thyme leaves. It sounds simple, but when these flavors come together, they create magic.
I can’t stress enough the joy of taking your time to lovingly coat every inch of your prime rib roast with this rub. Ensuring that every nook and cranny is covered is not just recommended; it’s essential for that burst of flavor in every bite. And here’s a little tip from me to you: do this about an hour before your roast ventures into the oven. This extra step allows those gorgeous flavors to penetrate deeply, promising a roast that is nothing short of spectacular.
Roasting Pan Setup
The setup of your roasting pan is crucial. You’ll want to start by placing your beautiful roast on a sturdy roasting rack within the pan. This not only elevates your roast, allowing the heat to circulate evenly, but also collects those delicious drippings that you can use later for gravy. Now, here’s a little trick I’ve learned – line your roasting pan with aluminum foil. Trust me, it’s a total game-changer for cleanup. No one wants to spend the evening scrubbing pans when there’s leftover prime rib to enjoy! Most importantly, make sure to position the fat side of the roast up. This way, as the fat melts away, it bastes the roast in all its flavorful glory, ensuring you get that juicy, tender bite every time. This little setup might just become your best-kept secret to nailing holiday dinner or any special occasion.
Cooking Time and Temperature
The secret truly lies in mastering the cooking time and temperature. Trust me, you don’t want to leave this to guesswork. For that mouthwatering, juicy centerpiece, your oven temperature should be set carefully, and timing is everything. If you’re like me, aiming for that glorious medium rare or maybe you prefer it on the rare side, knowing your roast’s internal temperature is key. I always say, a good meat thermometer isn’t just a tool, it’s your best pal in the kitchen.
Here’s a little nugget of wisdom: aim for about 5-10 degrees lower than your desired doneness when pulling that beauty out of the oven. Why? It’ll continue to cook, reaching that perfect medium or whatever your preference may be, as it rests. Bear in mind, whether you’ve got a boneless rib roast or its bone-in cousin, this trick never fails. A standing rib roast, right out of the oven, sitting there under its foil tent, is like a magic show. The internal temperature will keep rising to hit those right places, giving you the most amazing prime rib roast you could wish for. So, keep that oven door shut, watch the clock, and let that thermometer be your guide. Here’s to achieving perfect results every time!
Letting the Meat Rest
After the anticipation and the heavenly aroma wafting from the oven, it’s tempting to dive right into carving your perfect prime rib roast. But here’s the golden rule I’ve learned—patience at this stage is truly a virtue. Letting the meat rest is not just a suggestion; it’s a critical step for ensuring every slice is as succulent as the next. Imagine pulling your masterpiece out of the oven, its internal temperature peaking just right, only to let all those flavorful juices run out too soon. That’s a culinary crime I’d dare not commit!
What I do, and you should too, is tent the roast gently with aluminum foil. This isn’t to keep it warm, although it does help. No, it’s to let the magic happen inside. Those precious 20 minutes give the meat time to redistribute its juices evenly, ensuring that every slice is moist and flavorful. By doing so, the meat settles, and the internal temperature can continue to rise to perfection, achieving that ideal level of doneness we all strive for. It’s not just about waiting; it’s about elevating your roast from great to unforgettable. So next time, resist the temptation to cut too soon—your taste buds will thank you.
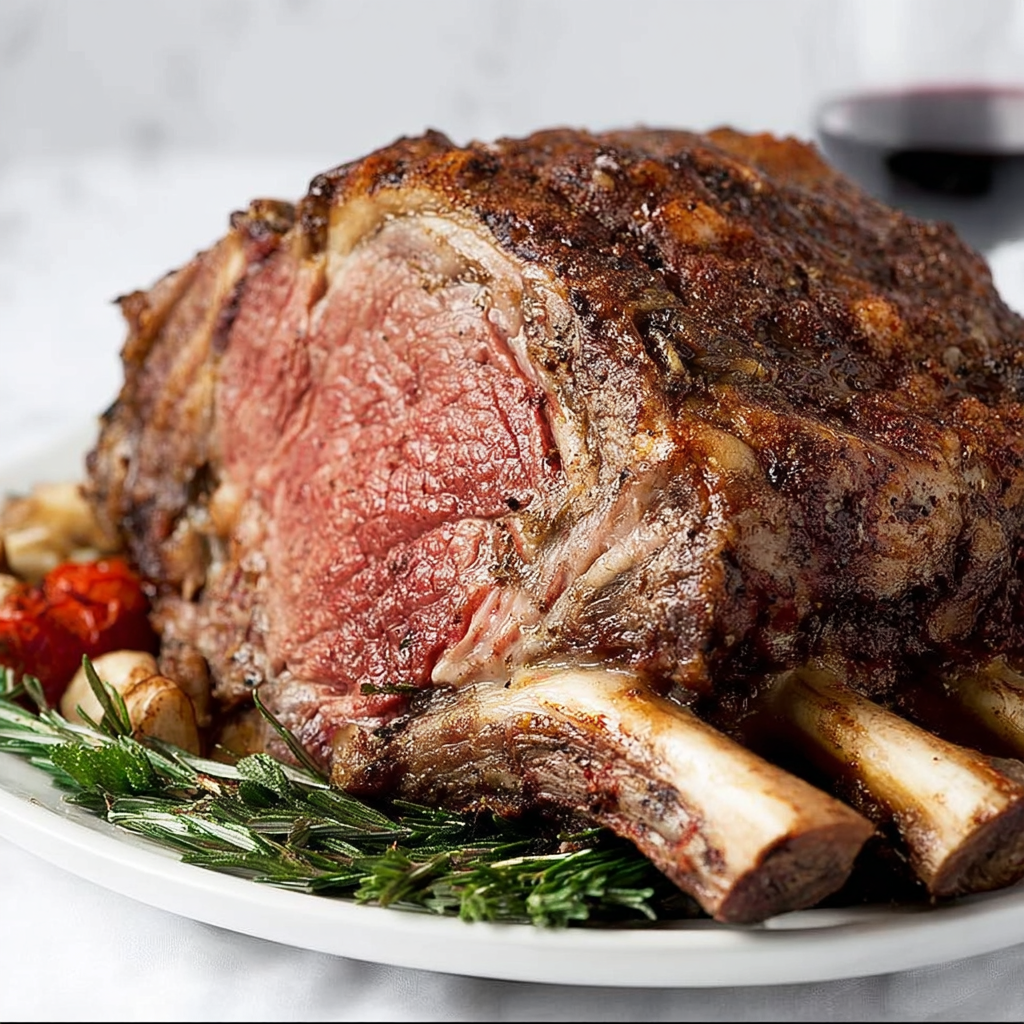
Carving Your Masterpiece

So, you’ve got your gorgeous prime rib roast out of the oven, smelling like a dream, and it’s rested just right. But wait, before you dive in, let’s chat about carving your masterpiece. Trust me, I’ve been there, standing in the kitchen, a bit intimidated by the beautiful roast in front of me, but here’s the easiest way to get it done.
- First things first, you’re gonna need a sharp knife. This is non-negotiable. A good, sharp knife makes all the difference between clean cuts and a shredded mess.
- Next up, if you’ve got a bone-in roast, you’ll want to tackle those rib bones first. Gently slice along the bone, separating it from the rest of the roast. This makes the entire process smoother and gives you more control over the meat.
- Now, for the grand finale, it’s time to slice the meat itself. Always go against the grain for the tenderest bites. This means, look at the way those muscle fibers are running, and cut across them, not alongside.
And there you have it, slicing up your prime rib roast isn’t just about getting it onto plates; it’s about doing justice to the time and love you’ve put into cooking it. With the right tools and these steps, you’ll be carving like a pro in no time.
Serving Suggestions
After mastering that perfect prime rib roast, it’s all about the sides and sauces to round off your special occasion dinner. I mean, the prime rib is the star, but it needs a supporting cast, right? Think of creamy mashed potatoes, crisp green beans, or fluffy Yorkshire puddings soaking up all those lovely juices. But hey, don’t shy away from getting a bit creative. Why not throw in something unexpected? A modern twist on the traditional or an unconventional side can elevate your holiday dinner to the next level. It’s about making those plates come back empty and those faces light up with joy!
Storing Leftovers
After enjoying that perfect medium prime rib roast during your special occasion, let’s chat about what to do with the leftovers, because let’s be honest, a good prime rib can be a gift that keeps on giving if you handle the leftovers correctly. First things first, you’ll want to wrap any leftover prime rib tightly in plastic wrap or aluminum foil. This is key to keeping it as fresh as possible. Then, pop it in the refrigerator to keep it safe and sound until you’re ready to transform it into tomorrow’s lunch or dinner. Now, here’s where it gets fun – think beyond just reheating that prime rib. Slice it up for some amazing prime rib sandwiches, or dice it and toss it into a salad for a protein-packed meal. The possibilities are as endless as they are delicious.
The Joy of Sharing a Perfect Prime Rib
There’s something truly magical about serving a perfect prime rib roast during the holiday season. Whether it’s a cozy Christmas dinner with the family or a grand holiday dinner destined to be talked about for years to come, the standing rib roast stands at the center, embodying both the warmth and the splendor of the occasion. After meticulously following each step, from selecting the right size roast at the local grocery store to mastering the cooking process in that roasting pan, the moment you present that masterpiece on the cutting board is nothing short of triumphant.
This joy isn’t just about the meat’s succulent flavors or how it effortlessly falls off the rib bones; it’s about the shared experiences, the holiday traditions in the making, and the sheer delight of your loved ones as they savor each bite. It teaches us the importance of patience, the virtue of precision, and, most importantly, the satisfaction of mastering a challenge. So, I encourage you to bask in the pride of your culinary achievements, let this easy prime rib recipe be a testament to your dedication, and allow it to inspire you to keep exploring, learning, and perfecting. Because in the end, it’s these moments of joy, these shared experiences, that make all the effort truly worthwhile.

Easy Prime Rib Roast
Ingredients
- 1 ribeye roast, about 5 pounds (bone-in or boneless)
- ½ cup unsalted butter, softened
- 1 teaspoon kosher salt
- 1 teaspoon dried rosemary, finely crushed
- 1 teaspoon dried thyme
- ½ teaspoon smoked paprika
- ½ teaspoon freshly ground black pepper
Instructions
- Take the ribeye out of the refrigerator and let it rest at room temperature for about 1½ hours. Allowing it to warm up slightly ensures more even cooking.
- In a small bowl, mix the softened butter with rosemary, thyme, paprika, salt, and black pepper until well combined.
- Rub the seasoned butter mixture all over the roast, coating every side.
- Set the roast on a rack inside a roasting pan lined with foil. Insert a meat thermometer into the thickest part of the roast, making sure it doesn’t touch bone or large pockets of fat.
- Roast, uncovered, following the cooking time guide for your preferred level of doneness (times may vary depending on weight and whether the roast is bone-in or boneless).
- Once done, remove the roast from the oven and loosely cover with foil. Let it rest for 20 minutes before slicing—the internal temperature will continue to rise by 5–10 degrees as it rests.
- Notes:
- Ribeye Roast Cooking Guide
- (Approximate times per pound at 350°F)
- Rare (120–125°F / 49–52°C)
- 15–17 minutes per pound
- Center will be cool to warm red
- Medium-Rare (130–135°F / 54–57°C)
- 18–20 minutes per pound
- Center will be warm pink with a hint of red
- Medium (140–145°F / 60–63°C)
- 20–22 minutes per pound
- Center will be mostly pink
- Medium-Well (150–155°F / 65–68°C)
- 23–25 minutes per pound
- Slightly pink center
- Well Done (160°F+ / 71°C+)
- 26–28 minutes per pound
- Fully cooked with little to no pink
- Always check doneness with a meat thermometer inserted in the thickest part of the roast, away from bone and fat. Remember, the temperature will rise about 5–10°F while the roast rests.
