Bakery-Style Oreo Chocolate Chip Cookies

I’ve always been enchanted by the magic that unfolds in the kitchen, especially when two beloved classics merge into an extraordinary creation. That’s how my journey into baking decadent bakery-style Oreo chocolate chip cookies began. Imagine the rich, velvety texture of traditional chocolate chip cookies, now imbued with the crunchy, creamy allure of Oreo chunks. The fusion of these treats isn’t just about combining flavors; it’s about crafting an experience, a cookie that’s both familiar and thrillingly unique. Every bite is a play of textures—from the chewy center of a chocolate chip cookie to the unexpected crunch of Oreo pieces—creating a flavor profile that’s complex, yet harmoniously balanced.
Key Takeaways:
- Merging classics: Blending the timeless allure of chocolate chip and Oreo cookies into a singular, extraordinary bakery-style cookie.
- Textural delight: Achieving a unique blend of chewy and crunchy textures for an unparalleled cookie experience.
- Flavor fusion: Crafting a harmonious balance between the beloved flavors of chocolate chips and Oreos.
Gathering Your Ingredients
Gathering the perfect ensemble of ingredients is akin to assembling a tiny troupe of culinary artists, each ready to play their part in creating something truly magical. For our decadent bakery-style Oreo chocolate chip cookies, the call sheet includes:
- Semi-sweet chocolate chips: the heartthrob of our cookie, bringing rich, chocolatey depth.
- Oreo pieces: not just any Oreos, but regular Oreos, crushed into small, chunky fragments of creamy, cookie goodness that offer a delightful crunch and a nostalgic nod to everyone’s favorite cream cookies.
- Room temperature unsalted butter: the unsung hero, ensuring our cookie has a soft, chewy texture, acting as the perfect stage for the interplay of flavors.
- Room temperature large eggs: binding our star ingredients with grace, providing structure and richness.
- All-purpose flour, cornstarch, baking soda, and salt: the supportive ensemble, meticulously measured to lend the cookies their signature chewy center and golden brown edges.
In the realm of cookie creation, every ingredient plays a starring role; thus, selecting each with care and attention ensures our Oreo stuffed chocolate chip cookies receive the standing ovation they deserve.
Prepping Dry Ingredients
Oh, the art of prepping dry ingredients! It might seem like just a small step, but trust me, it’s where the magic begins in making our bakery-style Oreo chocolate chip cookies. You see, by taking our purpose flour, along with a dash of cornstarch, a teaspoon of baking soda, and a pinch of salt, and giving them a thorough whisk or sift, we’re not just mixing. Oh no, we’re aerating the ingredients. This is crucial, my friends. It’s what gives our cookies that dreamy, tender texture.
And let’s not forget, achieving that perfect chewy center, golden brown edges, and that slight crunch when you first bite into them… well, it all starts here. In this seemingly simple act of combining our dry ingredients in a large bowl or medium mixing bowl, we set the stage for cookie greatness. So, grab your whisk, embrace the simplicity, and let’s get to creating those chewy chocolate chip cookies that will have everyone begging for the recipe.
Oreo Chunk Preparation

Oh, the magic begins when you start with those iconic cream cookies, the Oreos. It’s not just about tossing them into the mix; there’s a bit of an art to it. I’ve found that the best Oreo chunks come from a gentle touch and a bit of patience. You’ll want to either use your hands or a food processor, but here’s the trick: if you’re going the food processor route, pulse it just a few times.
You’re aiming for small and medium-sized pieces that promise a burst of flavor in every bite, not Oreo dust. And if you’re like me, choosing the hands-on method, think of it as a therapeutic moment. Break those Oreos with care, letting each chunk tell its story in the dough. Regular Oreos, golden Oreos, or even those special edition flavors – they all work marvelously. The goal? To fold these beautiful Oreo pieces into your cookie dough, ensuring each bite offers that blissful crunch and irresistible Oreo flavor we all crave.
Creaming Butter and Sugars
One of my favorite steps in creating our decadent Bakery-Style Oreo Chocolate Chip Cookies is the moment I get to cream the butter and sugars together. I always use room temperature unsalted butter, cupping it in my hands for just a minute if it’s still a tad stiff from the fridge. With my large bowl and hand mixer set on medium speed, I watch as the butter, cozy brown sugar, and sparkling white granulated sugar blend into a light, fluffy cloud.
It’s not just about mixing ingredients; it’s about infusing air into our dough, setting the stage for cookies that boast a chewy center and golden brown edges every single time. This key step bridges the wet and dry ingredients, ensuring that every bite of our Oreo-stuffed chocolate chip cookies is a perfect balance of chewy texture and rich flavor. Truly, it’s a pivotal moment that transforms simple ingredients into the bakery-style wonders that often have me sneaking back to the cookie jar for just one more.
Incorporating Wet Ingredients
After we’ve turned our butter and sugars into a fluffy cloud of sweetness, the magic of incorporating wet ingredients takes the stage. Now, it’s time to introduce our vanilla extract and large eggs, including that crucial extra egg yolk, promising to bring unparalleled moisture and richness. Imagine gently whisking them into the creamed mixture, one element at a time, until each is fully embraced, creating a smooth, glossy base that’s the foundation of our cookie dough’s charm.
This step is more than just mixing; it’s about marrying flavors. The vanilla extract whispers sweet nothings, promising notes of warmth and depth, while the eggs, with a tender touch, promise to bind our dough with a loyalty that’ll carry through to the chewy center of each baked cookie. The additional egg yolk is our secret weapon, a pledge of extra richness and tenderness in every bite, guaranteeing that these cookies won’t just be any cookies. They’ll be your favorite cookies, the ones that hug each Oreo chunk and chocolate chip like cherished friends.
Combining Wet and Dry Ingredients
Now, here’s where the real magic happens in our kitchen—combining the dry and wet ingredients. Picture this: you’ve got your beautifully creamed mixture of unsalted butter, sugars, and those key wet ingredients—vanilla extract and large eggs, sitting fluffy and inviting in your mixing bowl. Next to it, another bowl holds the sifted harmony of purpose flour, a pinch of salt, and that crucial bit of baking soda, all waiting for their turn. The moment’s come to unite them. With my hand mixer set on low speed, I begin to gradually marry the two.
It’s a slow dance, really, ensuring each speck of the flour mixture finds its way into the creamy base without losing that airy texture we’re aiming for. Here, patience is your best friend; overmixing is the foe we want to avoid to keep our oreo chocolate chip cookies soft and chewy. Each addition renders the dough just a bit thicker, a bit closer to that coveted bakery-style cookie dough. Remember, we’re not just baking; we’re sculpting the perfect bite.
Folding in Chocolate Chips and Oreo Pieces
Now, this is where the magic really starts to happen. After we’ve mixed our dry and wet ingredients to perfection, it’s time to bring in the stars of our show—the chocolate chips and those unmistakable Oreo chunks. I gently fold them into the cookie dough with a spatula, turning the mixture carefully to distribute these treasures evenly.
It’s a bit like treasure hunting, ensuring every scoop of cookie dough will have its fair share of that chocolatey, creamy goodness. I do this lovingly, taking care not to crush the Oreos too much because those chunks offer a delightful texture and a burst of flavor in every bite. It’s this step that transforms the dough into something truly special, promising big cookies filled with gooey chocolate and surprise bites of Oreo in every chunk. Trust me, the combo of semi-sweet chocolate chips with the creamy, crunchy Oreos is what bakery-style dreams are made of. And, while it might be tempting to go full speed ahead and rush this part, taking the time to fold everything together slowly ensures our cookies will be nothing short of perfection.
Chilling and Prepping for Bake
So here’s the thing about making those big, bakery-style Oreo Chocolate Chip Cookies that everyone can’t get enough of – chilling is your secret weapon. Chilling the dough isn’t just one more step; it’s the game-changer. It deepens the flavors, ensuring every bite is a perfect blend of sweet, rich chocolate chips, and those irresistible Oreo chunks. But it does more; it stops the cookies from spreading too thin in the oven, giving you that dreamy, thick texture with a chewy center.
Before you get lost in the anticipation of that first bite, let’s talk about the prep. First, preheat your oven to that sweet spot of 350°F. Take out your favorite baking sheets and line them with parchment paper. This little step is a big deal – it means your cookies will slide off effortlessly, with no sticky bottoms in sight. Now for the fun part: roll your chilled cookie dough into big, generous balls. Think of each one as a promise of the chewy, chocolatey, Oreo-filled goodness to come. Pop them onto your prepared sheets, and you’re almost there. The stage is set for some seriously decadent, bakery-style magic to happen in your kitchen.
Baking and Cooling
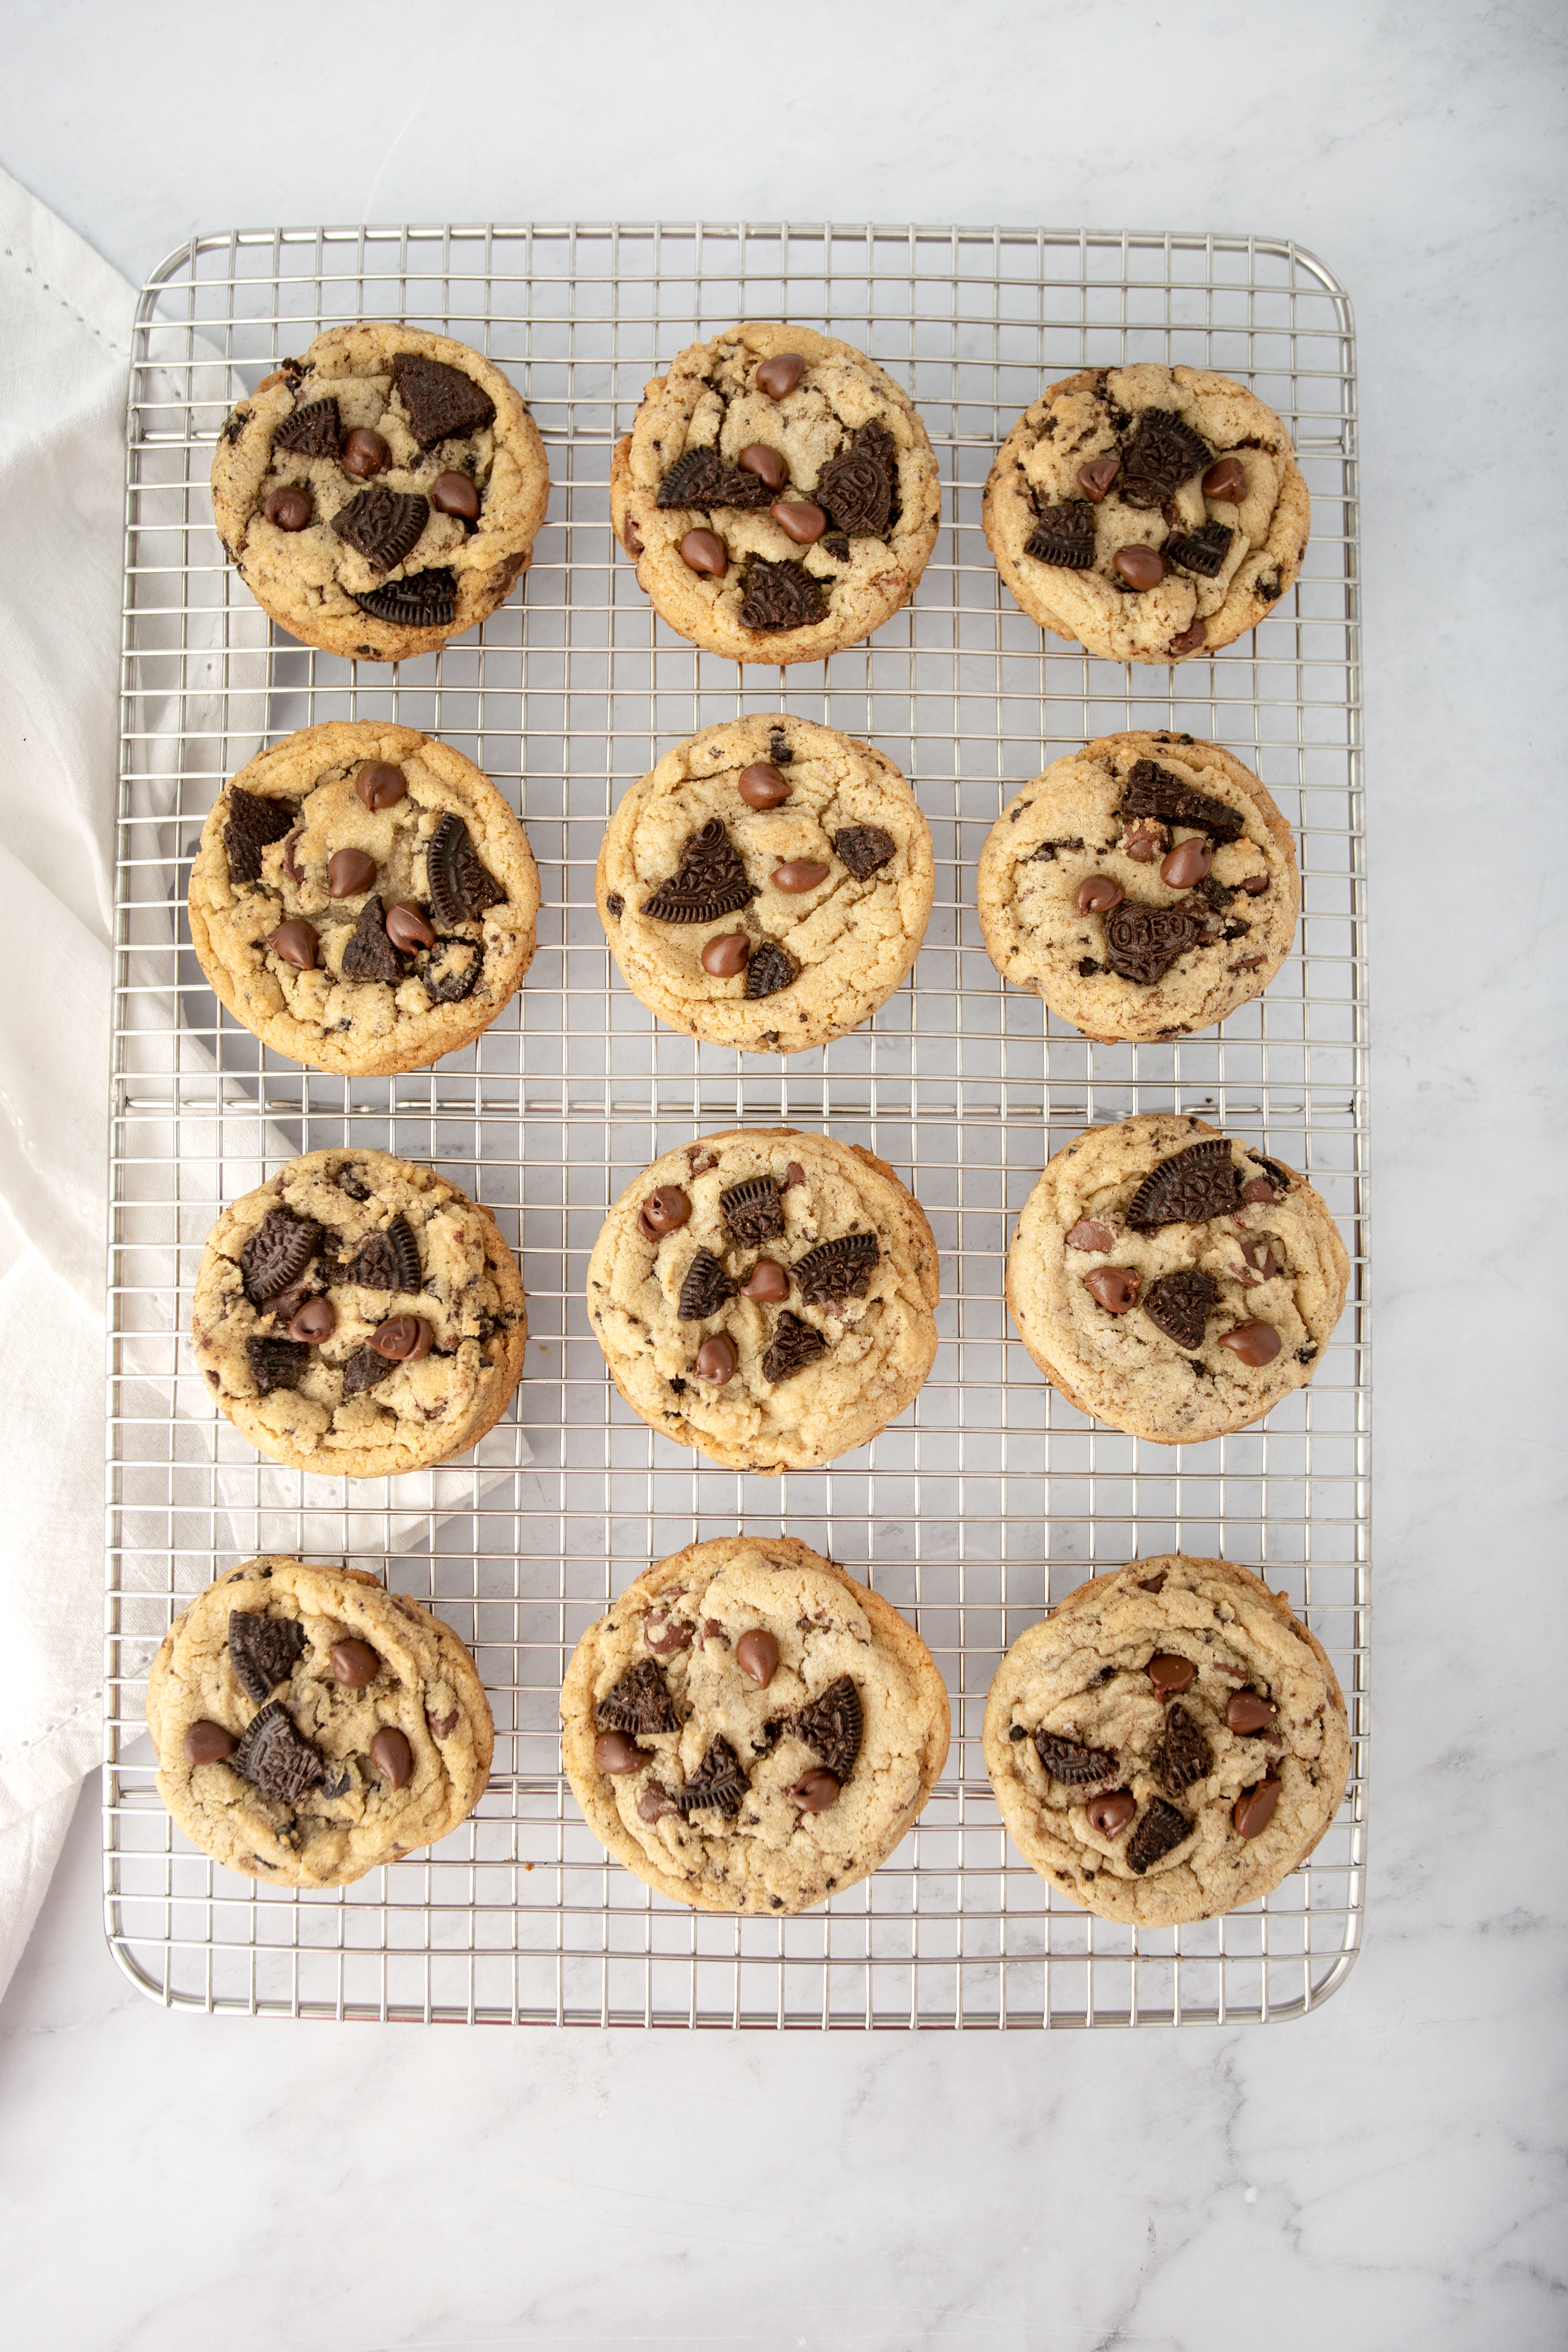
Now, we’re getting to the heart of the magic: baking and cooling. After your cookie dough has had its chill time, it’s ready to hit the oven, which you’ve prepped at a toasty 350°F. Scoop your cookie dough balls onto parchment paper-lined cookie sheets, giving them plenty of room to spread into those big, bakery-style cookies we’re dreaming of. Bake these beauties for 13-15 minutes, just until the edges turn that coveted golden brown and the chewy center sets but remains soft. The exact baking time can be your secret weapon for achieving that perfect chewy texture.
Once out of the oven, here’s a trick that’ll make your cookies look like they’ve just come from the display window of your favorite bakery: while they’re still warm, gently press a cookie cutter or the rim of a tall glass around the top of the cookie. This little nudge helps to create perfectly round cookies and gives them that professional finish. Finally, transfer your cookies to a cooling rack. Letting them cool here is not just a formality; it’s crucial for setting the cookies’ structure and enhancing their chewy texture. Whether you’re digging into them while they’re just warm or letting them cool completely, you’re in for a treat that’s as delightfully crunchy as it is chewily irresistible.
Baking and Cooling

Once you’ve sweetly wrapped your artisanal dough in plastic wrap and let it chill, it’s showtime. Preheat your oven to a cozy 350°F, a temperature that’s like a warm hug for your cookie dough balls. Gently place them on a cookie sheet lined with parchment paper, ensuring there’s room for them to spread into golden, chewy chocolate chip cookies with those irresistible Oreo chunks peeking through.
Bake them for just the right amount of time, 13-15 minutes, until you see the edges kiss a golden brown hue but the centers remain a soft, chewy dream. Here’s where the magic of a simple kitchen trick comes into play—grab a cookie cutter or glass and gently swirl around each cookie right out of the oven. This little nudge nudges them into perfectly round beauties. Finally, let them grace a cooling rack, where they’ll achieve the ultimate chewy texture, a testament to your newly minted bake sale legend status.
The Sweetest Ending: Enjoying Your Creation

Savor your bakery-style Oreo chocolate chip cookies with a tall glass of milk, ensuring leftovers stay fresh in an airtight container.

Bakery-Style Oreo Chocolate Chip Cookies
Ingredients
- 2 ½ cups all-purpose flour
- ¼ cup cornstarch
- 1 tsp baking soda
- 1 tsp salt
- ¾ cup Oreo pieces, about 6 Oreos, broken into small and medium chunks
- 1 cup 2 sticks unsalted butter, softened
- 1 cup packed brown sugar
- ½ cup white granulated sugar
- 1 tsp pure vanilla extract
- 1 large egg
- 1 egg yolk
- 1½ cups semi-sweet chocolate chips
Instructions
- Prep the dry ingredients:
- In a medium bowl, whisk together the flour, cornstarch, baking soda, and salt. Set aside.
- Break up the Oreos:
- Roughly break the Oreos into small and medium-sized pieces using your hands or by gently pulsing them in a food processor (just a few times—don’t turn them into crumbs!).
- Cream the butter and sugars:
- In a large mixing bowl, beat the softened butter, brown sugar, and granulated sugar on high speed for 3–4 minutes, until light and fluffy. Scrape down the bowl as needed.
- Add wet ingredients:
- Mix in the vanilla, egg, and egg yolk until fully combined and smooth.
- Mix in the dry ingredients:
- Gradually add the flour mixture to the butter mixture, mixing just until combined.
- Fold in the chocolate chips and Oreos:
- Stir in the semi-sweet chocolate chips and Oreo pieces until evenly distributed. Chill the dough for 40 minutes.
- Preheat and prep:
- Preheat your oven to 350°F and line two cookie sheets with parchment paper. Scoop large (3 oz) balls of cookie dough. Place 6 dough balls on one baking sheet and pop that tray in the freezer while the oven finishes preheating. Keep the rest in the fridge.
- Bake:
- Bake the first batch of cookies for 13–15 minutes, or until the edges are golden and the centers are still soft. Let them rest on the baking sheet for 4 minutes.
- Shape & top:
- Use a biscuit cutter or the rim of a glass to gently swirl around each cookie to make them perfectly round. Top with extra Oreo pieces and a few extra chocolate chips while warm.
- Cool:
- Transfer to a wire rack and cool until just warm or completely cooled — either way, they’re amazing!
